Building a simulator with Sismo equipment
There are two ways to work with Sismo Soluciones.
• The first is our Plug&Fly modules, a high-quality solution with no hassle. Letting you focus on the simulation.
• The second is to build a Sismo cockpit yourself.
This post is about the DIY solution.
You’ll get involved with the electronics. You’ll learn how to read our contact map. You’ll learn about our Ethernet technology and the testing software SC-Pascal. There will also be local area networks to configure. The good news is that you do not have to learn how to code. All of the software has been developed for you. Once it is built, you will be able to connect to ProSim, iFly or directly to X-Plane11 using the Zibo mod and our custom application OrbitXP.
There are many reasons to do this:
• You don’t have the cash for a Plug&Fly module.
• You have a custom simulator.
• There are shipping limitations to your country.
Building it yourself will provide more satisfaction and you’ll learn more about the simulator.
Why choose our solution?
Simulators are complicated.
For a fully working simulator, there are thousands of wires, which means thousands of possible mistakes.
People start with Arduino and discover that they need to write their own software for their flight simulation software to recognise their DIY build. And while this is totally possible, it is a solution which takes a lot of knowledge and time to accomplish.
We have made this much simpler.
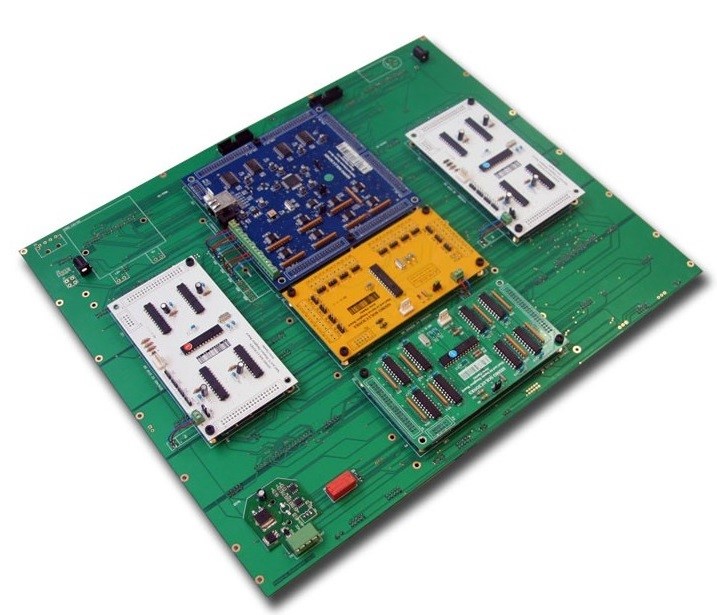
We have designed the electronic boards using Ethernet technology specifically for flight simulation. Our motherboard the SimCard SC-MB is used in all of our Plug&Fly modules.
The SC-MB acts as the control board and is connected to one of our Baseplates. There are specific baseplates for each Plug&Fly module (FWD, AFT, MIP and Pedestal). This Baseplate is essentially an interface between the SC-MB and the control modules. It is a large PCB which contains most of the wiring.
The SC-MB is the blue card in the image. There are other electronic boards which are the daughter boards of the SimCard family. These increase the I/O capabilities of the SC-MB.
|
|
To connect a module, e.g. the Navigation Panel Module, you need to connect different cables from the module to the baseplate. These could be Flat ribbon cables, or simple two, three or four wire cables with a pressure connector. You must consult the datasheet of the module (NAV) and also the datasheet of the baseplate you are connecting to (pedestal).
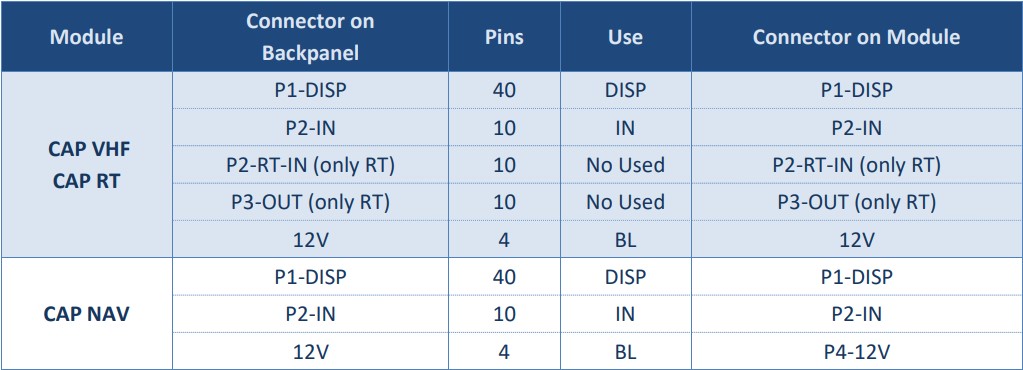
In this example from the Pedestal Baseplate datasheet you can see that to connect the Navigation Panel module on the Captain side, you need three connectors (included in the price). One 40 pin flat ribbon cable for displays, one 10 pin flat ribbon cable for Inputs and one 4 pin cable for the Backlight. You can also see the name of the connectors; these are clearly indicated on the PCB of the module and baseplate.
It is important to follow our plan exactly because there are 12V circulating through some of the flat ribbon cables and if any parts are reversed, there will be damage. The most likely part to break is the motherboard SC-MB. If you don’t connect the wires correctly, you also won’t be able to use our software scripts or native configurations, because these are based on our contact map.
Your only job is to follow the contact map exactly. It’s that simple.
Once that is done, you need to connect the hardware to your computer.
I won’t go into all the details here, but the essence is that you set up a local area network. The SC-MB uses Ethernet and an IP address to communicate in the network. This is a good solution if you have hardware from another company. There will never be any software compatibility issues.
You can then connect to ProSim, iFly or to Xplane11 Zibo. The process will depend on which add-on you choose.
We have manuals where you can read each of the steps to set up this network correctly.
Some more reasons to choose Sismo for your cockpit
SC-Pascal. This handy software which is free to download on our website permits you to test individual inputs and outputs with the push of a button. It is so useful because we can test why a given part isn’t working. Say a switch isn’t working, with SC-Pascal, we can discover whether it is a software or hardware issue and problem-solve easily. This is essential for a DIY cockpit.
Our frames and Casings are formidable. They are likely the most robust and well made in the amateur flight simulation industry. You can start your build by ordering a casing and a baseplate. Once these have arrived, you can wire up and connect any extra modules you want. On your own schedule.
Documentation. We have provided the datasheets for free online which include our wiring schedule. No other company offers this amount of information. If you are tech savvy, you could even use this information to develop your own scripts for our products. Please get in touch if you’re interested in this route.
We are built on innovation. We have been responsible for many advances in the low-cost flight simulation industry, our solutions are copied worldwide.
Integration: In addition to the software options you have now, at some point in the near future, we are planning to develop SismoLink. An interface to connect directly to FS2020 and P3D using the Add-on PMDG. This will offer you another option to connect your hardware.
We offer technical support to our clients and extensive manuals and documentation for your project.
A typical first purchase to build the FWD Overhead
Here we have the FWD Overhead frame. As you can see the Baseplate is already attached.
|
|
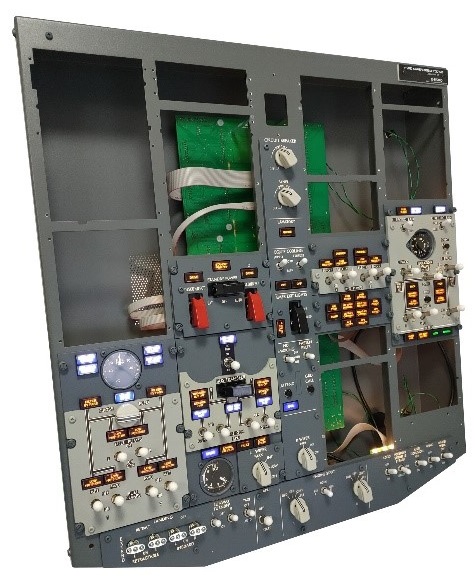
We also recommend our clients to include the Central Control Panel Module and the Exterior Lights Control Panel Module (bottom panel). This is because these two modules are harder to install later.
First Buy advice:
|
FWD |
MIP |
AFT |
Pedestal |
|
Frame Back Cover Bottom Panel(1) Central Panel(1) |
Casing Captain Baseplate Center Baseplate F/O Baseplate(2) Flat ribbon cables Kit for baseplates |
Frame Baseplate
|
Casing Baseplate |
(1) We recommend to install the Bottom Panel and Central Panel installed on the FWD as these have a difficult installation.
(2) You may not need to buy the F/O baseplate, depending on which modules you want to install.
Once you have made this first purchase, you can add the remaining modules at your own convenience.
Disclaimer
We’d also like to be transparent about what sort of support and warranty you can expect from us.
We will be glad to advise you, and point you in the direction of a manual which contains the information you need. We can’t do the configuration for you.
It’s important to know that you accept the responsibility of the build, and if there is any damage done to the equipment we would not be held responsible.
If something appears to be broken, we will ask you to do a hardware test in SC-Pascal. If nothing happens, you can send the module to repair at Sismo. Another great part of our modular approach is that you can send the individual panels for us to repair. We will then investigate the issue and determine whether a warranty is valid under legally established conditions.
Some feedback from our clients
Ahmed abu T.
“I have made very good experiences with Sismo: The time schedule was more than kept, the panels are of great quality and the sales support was very great, friendly, quick and even made me a gift, when adding the second nav for the discounted price, even after the sale has ended...keep up the great work.”
Eiketre
“I bought their complete B737Max modules and they were delivered in november as agreed. I have just positive things to say about Sismo. Outstanding service and very high-quality products.”
Brian E.
“Sismo is awesome! Excellent service! Shipping to the States was fast. Almost done my 737, all components from Sismo were constructed well.”
Fly Away – Miguel L.
“… my full cockpit is from Sismo, in my opinion they are the most trustworthy ,helpful people you will come across, quality of product , the best in the market at the moment, the Modules using Ethernet connection is unique”